ShopDreamUp AI ArtDreamUp
Deviation Actions


Suggested Deviants


Suggested Collections


You Might Like…


Description
Creating a Character Maquette Armature
There are several different methods and I fully advise taking this information and applying it to your situation and changing things where you need – no one system is perfect for everyone!!!
Examples of this type of armature: [link]
Used for these sculptures: [link] [link]
Supplies needed:
Armature wire – I use 1/8” or 1/16” aluminum [link]
Foil
Masking tape or cloth tape
Wooden base if desired – I tend to use 1”x6” pine
Wire cutters
Pliers
Drill and a Drill bit slightly larger than your leg armature
Writing utensil
1. It’s very helpful to have an in scale drawing of whatever character you want to sculpt – preferably but not necessarily in multiple views – front, side, back. This is quite useful when figuring the dimensions of limbs in 3 dimensional space, since if they’re bent they’ll appear shorter.
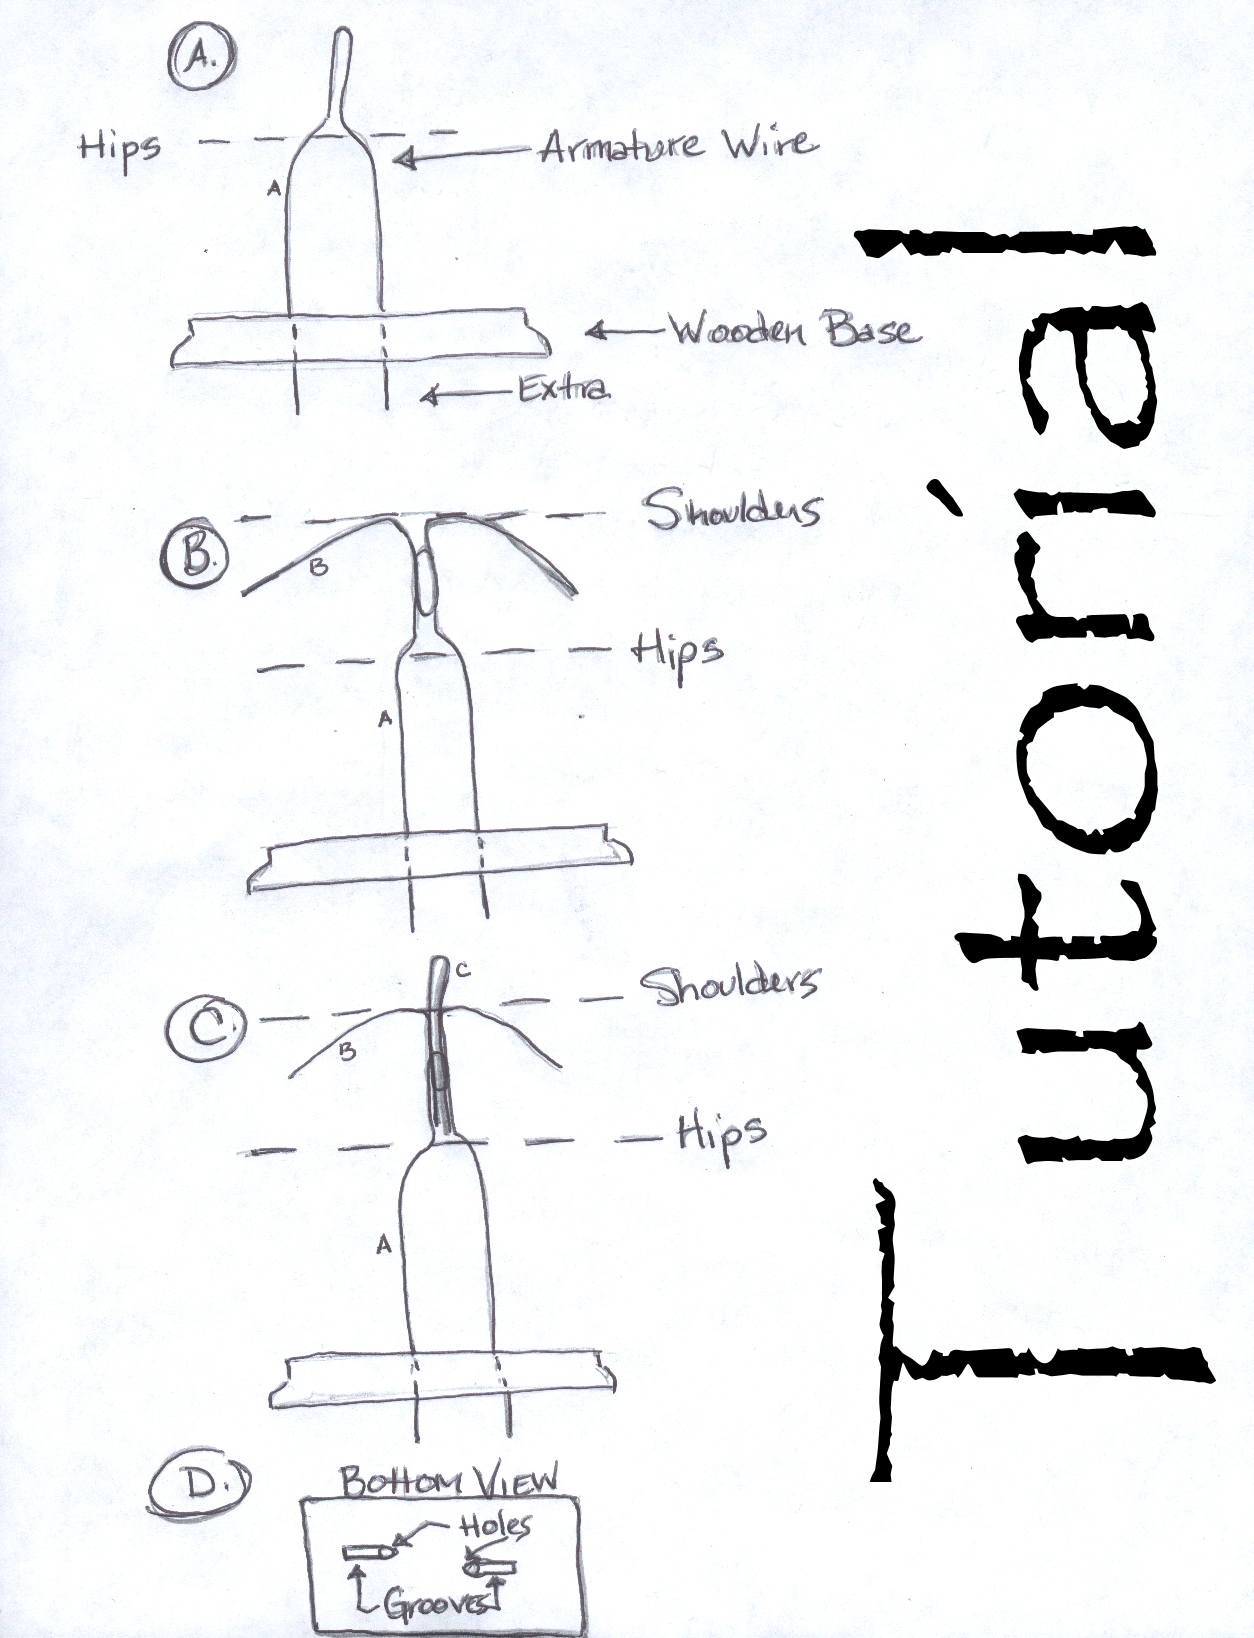
2. Begin by measuring out the armature, continually comparing to the image. Start at the bottom of one foot, the armature should go from beneath the base with ½” extra beneath, up through the base, up the leg leaving a curve for the hip, up into the torso area a bit and then back down and repeated for the other leg. (See image A) The area in the torso should get pressed together with a pair of pliers till there is no gap remaining.
3. Once you have the needed shape down for the legs, find the placement desired for the figure on the base and mark – with a writing utensil – where the armature needs to go through the wood of the base.
4. Wrap the armature with tape, except for the length that passes through the wood. The tape is helpful, mostly with polymer clays, to better adhere the clay to the wire, it has a tendency to pull away from the wire. If you don’t feel this will be useful, feel free to skip all tape steps.
5. Next, starting at the wrists, begin a similar process for the arms. Measure out from wrist to wrist, leaving a loop in the center for the torso again, like with the legs. If needed, adding thinner wire for fingers at the wrist junction, either wrapping a length of the wire up the arm from the wrist base, or attaching with tape or even epoxy of some kind. (See image B)
6. Once again, wrap with tape, this time the entire piece of wire.
7. Place the arm and leg pieces together, lining up the shoulder and hip lines with the image. When at a correct position, tape the torso where the two pieces overlap.
8. Repeat the process for the head and neck, leaving extra through the torso again. Also helpful is putting an angle in the neck as needed, or building up the head area with foil but remember to leave space on top to sculpt the clay – smaller is better in this instance! Also make sure that you really pack the foil tight, rolling it on the table tends to help. (See image C)
9. Completely wrap the armature and foil with tape.
10. Place together with the body, compare to the image, and tape together.
11. Drill the necessary holes in the base at the marks previously made and cut grooves going towards or away from each other on the bottom for the extra armature wire – this helps stabilize the structure. (See image D)
12. Mount figure by sliding armature through the base holes and bending the extra into the grooves in the base. I tend to cover these with masking tape for sculpting purposes and felt for the final.
I tend to mount onto the base because I like it as the finished product having the base. There are definitely other options, including a wire coming out the figure from the back or the center point, in all of these versions the wire can get trimmed back and the figure can be free standing. With polymer clays I put the entire thing in the oven to cure, base included.
Also, if you need more rigidity in the armature, you can do a similar process as above but for every individual wire, twist two together for the same length. This is possible by hand, but infinitely faster by placing them in a drill gun, tightening down to the wire and holding the two ends, slightly apart with a pair of pliers while you run the gun. Also, on the torso area, for added strength, you can wrap with very thin wire (like floral wire) up the length, similar to the concept of the tape.
If you wish to mold and cast these characters, it’s good to learn a whole lot more about whatever process you’re interested in and conforming your process to those needs, but an easy armature joint for that purpose is small square K&S brass tubing of two sizes that fit together where ever a piece (ie – arm, leg, head) needs to come off for the casting. Epoxy the pieces onto the armature at both sides of the break so they fit together for the sculpting period and are easily broken apart at the needed time.
For supplies I recommend -
The Compleat Sculptor, Inc.
90 Vandam Street
New York, NY 10013
[link]
They are absolutely amazing, have pretty much everything and are extremely helpful and nice. If you have questions about a project, they will try their best to lead you to the supplies you need.
And for now, pardon the bad images above, doing this quick as a request – I’ll do photos along with a build next time I make an armature and post those pics too. Any questions are more that welcome!
--------------------------------------
sculpturalmyth@yahoo.com
[link]
There are several different methods and I fully advise taking this information and applying it to your situation and changing things where you need – no one system is perfect for everyone!!!
Examples of this type of armature: [link]
Used for these sculptures: [link] [link]
Supplies needed:
Armature wire – I use 1/8” or 1/16” aluminum [link]
Foil
Masking tape or cloth tape
Wooden base if desired – I tend to use 1”x6” pine
Wire cutters
Pliers
Drill and a Drill bit slightly larger than your leg armature
Writing utensil
1. It’s very helpful to have an in scale drawing of whatever character you want to sculpt – preferably but not necessarily in multiple views – front, side, back. This is quite useful when figuring the dimensions of limbs in 3 dimensional space, since if they’re bent they’ll appear shorter.
2. Begin by measuring out the armature, continually comparing to the image. Start at the bottom of one foot, the armature should go from beneath the base with ½” extra beneath, up through the base, up the leg leaving a curve for the hip, up into the torso area a bit and then back down and repeated for the other leg. (See image A) The area in the torso should get pressed together with a pair of pliers till there is no gap remaining.
3. Once you have the needed shape down for the legs, find the placement desired for the figure on the base and mark – with a writing utensil – where the armature needs to go through the wood of the base.
4. Wrap the armature with tape, except for the length that passes through the wood. The tape is helpful, mostly with polymer clays, to better adhere the clay to the wire, it has a tendency to pull away from the wire. If you don’t feel this will be useful, feel free to skip all tape steps.
5. Next, starting at the wrists, begin a similar process for the arms. Measure out from wrist to wrist, leaving a loop in the center for the torso again, like with the legs. If needed, adding thinner wire for fingers at the wrist junction, either wrapping a length of the wire up the arm from the wrist base, or attaching with tape or even epoxy of some kind. (See image B)
6. Once again, wrap with tape, this time the entire piece of wire.
7. Place the arm and leg pieces together, lining up the shoulder and hip lines with the image. When at a correct position, tape the torso where the two pieces overlap.
8. Repeat the process for the head and neck, leaving extra through the torso again. Also helpful is putting an angle in the neck as needed, or building up the head area with foil but remember to leave space on top to sculpt the clay – smaller is better in this instance! Also make sure that you really pack the foil tight, rolling it on the table tends to help. (See image C)
9. Completely wrap the armature and foil with tape.
10. Place together with the body, compare to the image, and tape together.
11. Drill the necessary holes in the base at the marks previously made and cut grooves going towards or away from each other on the bottom for the extra armature wire – this helps stabilize the structure. (See image D)
12. Mount figure by sliding armature through the base holes and bending the extra into the grooves in the base. I tend to cover these with masking tape for sculpting purposes and felt for the final.
I tend to mount onto the base because I like it as the finished product having the base. There are definitely other options, including a wire coming out the figure from the back or the center point, in all of these versions the wire can get trimmed back and the figure can be free standing. With polymer clays I put the entire thing in the oven to cure, base included.
Also, if you need more rigidity in the armature, you can do a similar process as above but for every individual wire, twist two together for the same length. This is possible by hand, but infinitely faster by placing them in a drill gun, tightening down to the wire and holding the two ends, slightly apart with a pair of pliers while you run the gun. Also, on the torso area, for added strength, you can wrap with very thin wire (like floral wire) up the length, similar to the concept of the tape.
If you wish to mold and cast these characters, it’s good to learn a whole lot more about whatever process you’re interested in and conforming your process to those needs, but an easy armature joint for that purpose is small square K&S brass tubing of two sizes that fit together where ever a piece (ie – arm, leg, head) needs to come off for the casting. Epoxy the pieces onto the armature at both sides of the break so they fit together for the sculpting period and are easily broken apart at the needed time.
For supplies I recommend -
The Compleat Sculptor, Inc.
90 Vandam Street
New York, NY 10013
[link]
They are absolutely amazing, have pretty much everything and are extremely helpful and nice. If you have questions about a project, they will try their best to lead you to the supplies you need.
And for now, pardon the bad images above, doing this quick as a request – I’ll do photos along with a build next time I make an armature and post those pics too. Any questions are more that welcome!
--------------------------------------
sculpturalmyth@yahoo.com
[link]
Image size
1254x1638px 1.43 MB
© 2006 - 2024 shalonpalmer
Comments15
Join the community to add your comment. Already a deviant? Log In
your tutorial is very good! thanks for posting it!